Before diving into the juicy details of my easy chipped beef cheese ball recipe, let’s chat about what you can pair this scrumptious dish with. Imagine your cheese ball set out on a grand table surrounded by an array of delightful accompaniments. Picture it: crispy crackers, crunchy veggies, and maybe even a warm, toasted baguette.
Crackers: Think about using a variety of textures. Some could be salty, while others are more subtly flavored. This will allow your cheese ball to shine.
Veggies: Carrots, celery sticks, and bell pepper slices can add a refreshing crunch. Dipping raw veggies in cheese ball bliss? Yes, please!
Baguette Slices: Toasted sliced baguette would be a fantastic way to scoop up the tasty treat. The contrast of creamy and crunchy will elevate your experience.
So, whether you’re attending a cocktail party or just looking to impress the family on movie night, this cheese ball is the perfect addition.

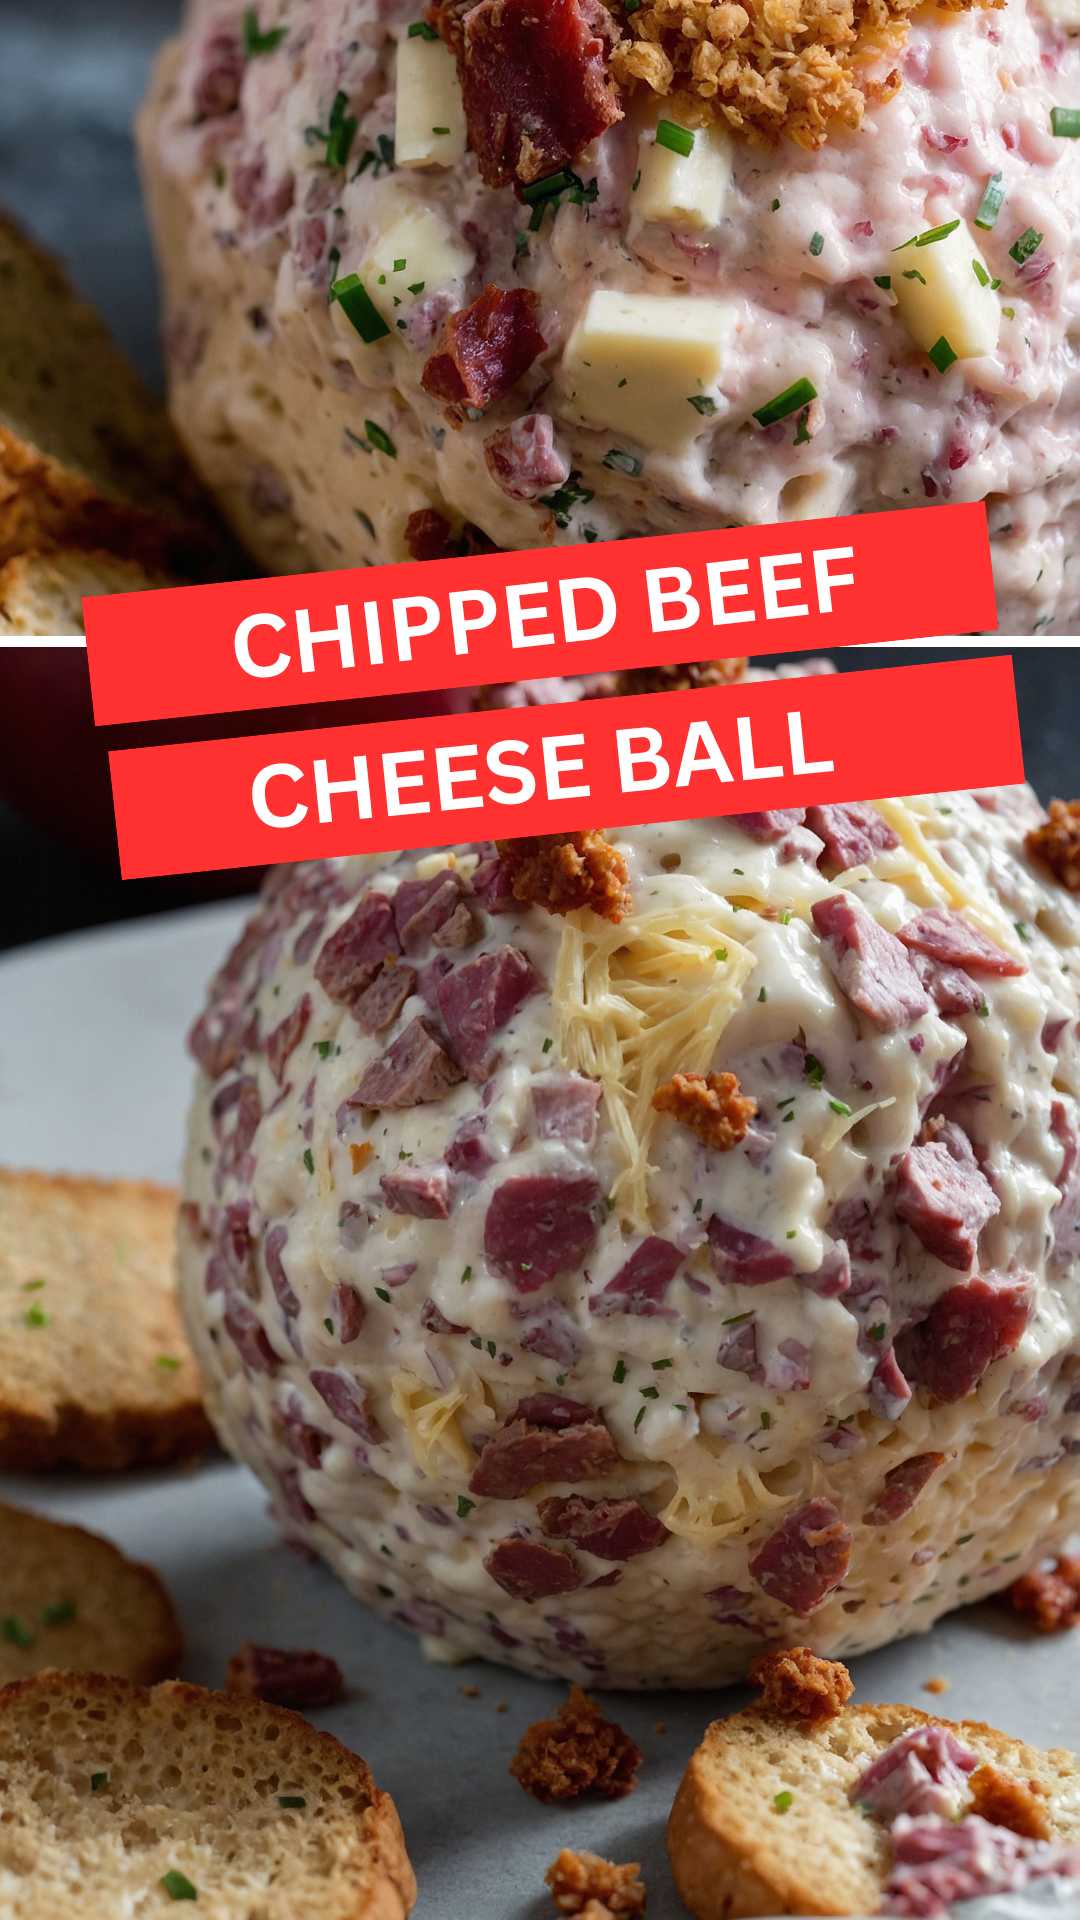
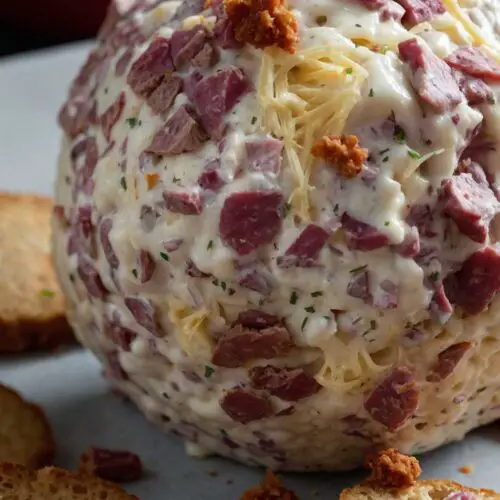
Ah, the cheese ball. It’s a classic party dish that evokes nostalgia and a sense of casual comfort. For many, it brings back memories of family gatherings and potlucks. My version of the good ol’ cheese ball features chipped beef, making it rich, savory, and downright irresistible.
While some recipes can feel daunting, fear not! This easy chipped beef cheese ball is straightforward and guarantees your guests will come back for seconds—maybe even thirds.
Fun fact: Did you know the cheese ball goes back to the 1800s? These delightful bites started as a means to showcase cream cheese, which was quite the novelty back then!
You Might Also Like These Recipes!
What is Easy Chipped Beef Cheese Ball?
Put simply, it’s a delightful mixture of cream cheese, sharp cheddar, Worcestershire sauce, and, most importantly, chipped beef. These ingredients meld together to create a creamy, chewy, savory experience that transcends a regular cheese dip.
Imagine a bite of smoky beef, the tanginess of Worcestershire, and the richness of cheese all in one go. It’s a flavor explosion that leaves you eager to dive in for more.
And if you think cheese balls are just for parties, think again! This one can turn any casual night into a mini celebration. With this recipe, you can whip up an elegant snack that shines at any gathering without spending hours in the kitchen.
Why You’ll Love This Easy Chipped Beef Cheese Ball?
Let me count the ways:
1. Simplicity: This recipe is incredibly easy to follow. If you can mix ingredients, you can make this cheese ball.
2. Flavor Fusion: The blend of smoked paprika, Dijon mustard, and Worcestershire creates layers of flavor that dance on your taste buds.
3. Versatility: Serve it with a range of accompaniments—crackers, veggies, or even fruits like apples.
4. Make Ahead: You can prepare this cheese ball well in advance. Make it the night before, and it’s ready to shine when you are.
5. Crowd Pleaser: Friends, family, kids—you’ll find everyone loves digging into this creamy goodness. It’s hard to find someone who doesn’t love cheese!
Trust me, once you bring this to the table, you’ll quickly become the party MVP. Friends will be lining up for the recipe. Spoiler alert: This recipe is so uncomplicated they might think it’s a well-kept secret!
The Ingredients You Will Need To Make Easy Chipped Beef Cheese Ball
Before you gather in the kitchen, ensure you have everything. Here’s your handy shopping list:
- 2 (8-ounce) blocks of cream cheese, softened to room temperature for a smooth mix.
- 1 cup sharp cheddar cheese, shredded to infuse that cheesy goodness.
- 5 ounces cured beef, chopped. Don’t skimp here; the flavor comes from this.
- 5 scallions, chopped. They add that refreshing crunch and punch.
- 1 tablespoon Worcestershire sauce, the secret ingredient for that umami kick.
- 1 teaspoon Dijon mustard for a touch of zing.
- 1/2 teaspoon granulated garlic, because who doesn’t love garlic?
- 1/2 teaspoon smoked paprika, which will add a whisper of smokiness.
- 1/4 teaspoon sea salt to elevate every other flavor.
Directions
Ready to get your hands dirty? Let’s go through the steps to create this cheesy wonder.
Step 1: Prep the Cream Cheese
Start by taking your softened cream cheese and tossing it into a mixing bowl. Here, you want it to be easily spreadable. I find the best results come when you let it sit out for around 30 minutes.
Step 2: Mix the Cheeses
Next, add that cup of sharp cheddar cheese. This is where you can get creative: want to add a touch of pepper jack? Go for it! Stir until well combined. The two cheeses should blend perfectly into a creamy mixture.
Step 3: Combine the Ingredients
Now, toss in the chopped cured beef and half of the scallions. Add your Worcestershire sauce, Dijon mustard, granulated garlic, smoked paprika, and salt. Use a spatula to fold everything together gently. You don’t want to overmix, but you do want a consistent blend.
Step 4: Shape the Cheese Ball
Once everything is mixed, go ahead and transfer the mixture onto a piece of plastic wrap. With the wrap, shape the mixture into a ball. This can get a bit messy, but that’s where the fun is!
Step 5: Chill
Wrap the ball tightly in the plastic. Let it chill in the fridge for at least 2 hours, or overnight is even better. Chilling allows flavors to meld together.
Step 6: The Grand Reveal
When you’re ready to serve, unwrap the cheese ball and sprinkle the remaining chopped scallions on top. For a little crunch, you can roll the cheese ball in extra chopped beef or nuts, if that strikes your fancy.

Notes
Here are five essential tips to ensure your cheese ball is a hit:
Choose Quality Ingredients: The quality of cheese and beef significantly enhances your outcome. Opt for a good brand; it will pay off in flavor.
Room Temperature: Remember to soften your cheese! Cold cream cheese is a nightmare and can lead to clumping.
Personalize It: Don’t hesitate to tweak the ingredients to suit your taste. Add some crushed red pepper flakes if you want a bit of heat!
Garnish Creatively: Fresh herbs like dill or parsley can bring a refreshing touch to the presentation.
Experiment with Dips: Consider serving it with different types of dips on the side. Maybe a spicy salsa or a sweet fig jam could create an interesting flavor profile.
Storage Tips
If, by some chance, you have leftovers, you can store this cheese ball in an airtight container in the fridge for about a week. Just make sure to allow it to chill for a bit after taking it out, as it can soften if left at room temperature too long.
Nutrition Information
Yet, while enjoyment is key, nutritional awareness also matters.
- Serving Size: About 2 tablespoons
- Calories: Approximately 100
- Protein: 5g
- Fat: 8g
- Carbohydrates: 2g
It’s important to note that these values can fluctuate based on specific ingredients and quantities used.
Serving Suggestions
Now, let’s talk about how to serve this delightful creation.
- With Crackers: Use a mix of flavored and plain crackers for a delightful taste combination. A strong, savory cracker works beautifully alongside the cheese ball.
- Fresh Vegetables: Provide a platter of crunchy veggies. Carrots, cucumbers, and bell peppers are delicious options for dipping.
- On Toasted Baguette: Serve the cheese ball spread on crispy baguette slices. The crusty bread contrasts perfectly with the creamy texture.
- Charcuterie Board: Add this cheese ball to a charcuterie display. It adds a creamy balance to cured meats and cheeses.
- On Party Sandwiches: Smear some of the cheese ball on a sandwich for added flavor. It’s especially delightful on rye or sourdough bread.

What Other Substitutes Can I Use in Easy Chipped Beef Cheese Ball?
If you find yourself without certain ingredients, here are some great substitutes:
- Cream Cheese: You can use Greek yogurt or cottage cheese for a lighter version. It won’t be as creamy, but it adds a nice twist.
- Chipped Beef: Any cured meat, such as prosciutto or salami, can work well. You can even swap it with cooked bacon bits for a smoky flavor.
- Sharp Cheddar: Smoked gouda or even pepper jack cheese can change the dynamics entirely. Each brings a unique flair.
- Worcestershire Sauce: Soy sauce or even a splash of balsamic vinegar can be a tasty alternative if you’re looking to experiment.
- Scallions: Diced red onions are a good substitute. They add a different layer of flavor without straying too far from the original idea.
Chipped Beef Cheese Ball
Equipment
- Bowls
Ingredients
- 2 8-ounce blocks of cream cheese, softened to room temperature for a smooth mix.
- 1 cup sharp cheddar cheese shredded to infuse that cheesy goodness.
- 5 ounces cured beef chopped. Don’t skimp here; the flavor comes from this.
- 5 scallions chopped. They add that refreshing crunch and punch.
- 1 tablespoon Worcestershire sauce the secret ingredient for that umami kick.
- 1 teaspoon Dijon mustard for a touch of zing.
- 1/2 teaspoon granulated garlic because who doesn’t love garlic?
- 1/2 teaspoon smoked paprika which will add a whisper of smokiness.
- 1/4 teaspoon sea salt to elevate every other flavor.
Instructions
- Ready to get your hands dirty? Let’s go through the steps to create this cheesy wonder.
Step 1: Prep the Cream Cheese
- Start by taking your softened cream cheese and tossing it into a mixing bowl. Here, you want it to be easily spreadable. I find the best results come when you let it sit out for around 30 minutes.
Step 2: Mix the Cheeses
- Next, add that cup of sharp cheddar cheese. This is where you can get creative: want to add a touch of pepper jack? Go for it! Stir until well combined. The two cheeses should blend perfectly into a creamy mixture.
Step 3: Combine the Ingredients
- Now, toss in the chopped cured beef and half of the scallions. Add your Worcestershire sauce, Dijon mustard, granulated garlic, smoked paprika, and salt. Use a spatula to fold everything together gently. You don’t want to overmix, but you do want a consistent blend.
Step 4: Shape the Cheese Ball
- Once everything is mixed, go ahead and transfer the mixture onto a piece of plastic wrap. With the wrap, shape the mixture into a ball. This can get a bit messy, but that’s where the fun is!
Step 5: Chill
- Wrap the ball tightly in the plastic. Let it chill in the fridge for at least 2 hours, or overnight is even better. Chilling allows flavors to meld together.
Step 6: The Grand Reveal
- When you’re ready to serve, unwrap the cheese ball and sprinkle the remaining chopped scallions on top. For a little crunch, you can roll the cheese ball in extra chopped beef or nuts, if that strikes your fancy.
Notes
Nutrition
Frequently Asked Questions
Can I freeze the cheese ball?
Freezing is possible! Wrap the cheese ball tightly in plastic wrap and foil before freezing. To thaw, simply transfer it to the fridge overnight.
How long can I leave this out at a party?
Generally, you shouldn’t leave perishable foods out for more than two hours. If it’s hot, consider keeping it chilled until you’re ready to serve.
Can I make these smaller for appetizers?
Absolutely! Just shape smaller balls or use a mini muffin pan to create bite-sized portions. They’ll make perfect finger foods.
What if I have dietary restrictions?
Feel free to make it gluten-free with gluten-free crackers or even serve it with veggies! Vegetarian? Just skip the beef and enhance the flavors with herbs and spices.
What’s the best way to serve it?
Serve it with an array of snacks! A colorful platter with veggies, crackers, and bread makes it visually appealing and ready for guests.
How do I know when the cheese ball is done?
You’ll know it’s ready when it has firmed up in the fridge. The flavors will be more unified, and the texture should be easy to spread.
Conclusion
There you have it—a delightful journey into the world of easy chipped beef cheese balls. Not only is this dish simple to make, but it also impresses with rich flavors that delight. Whether it’s a summer picnic, a winter holiday season, or just an ordinary weekday evening, having this recipe at your fingertips means you’ll always have a crowd favorite in your back pocket.
So, why not grab your ingredients today? Your next gathering is bound to be unforgettable with this cheesy delight front and center. Remember, cooking should be fun and an opportunity to share joy with others. Trust me, your friends won’t forget this one!