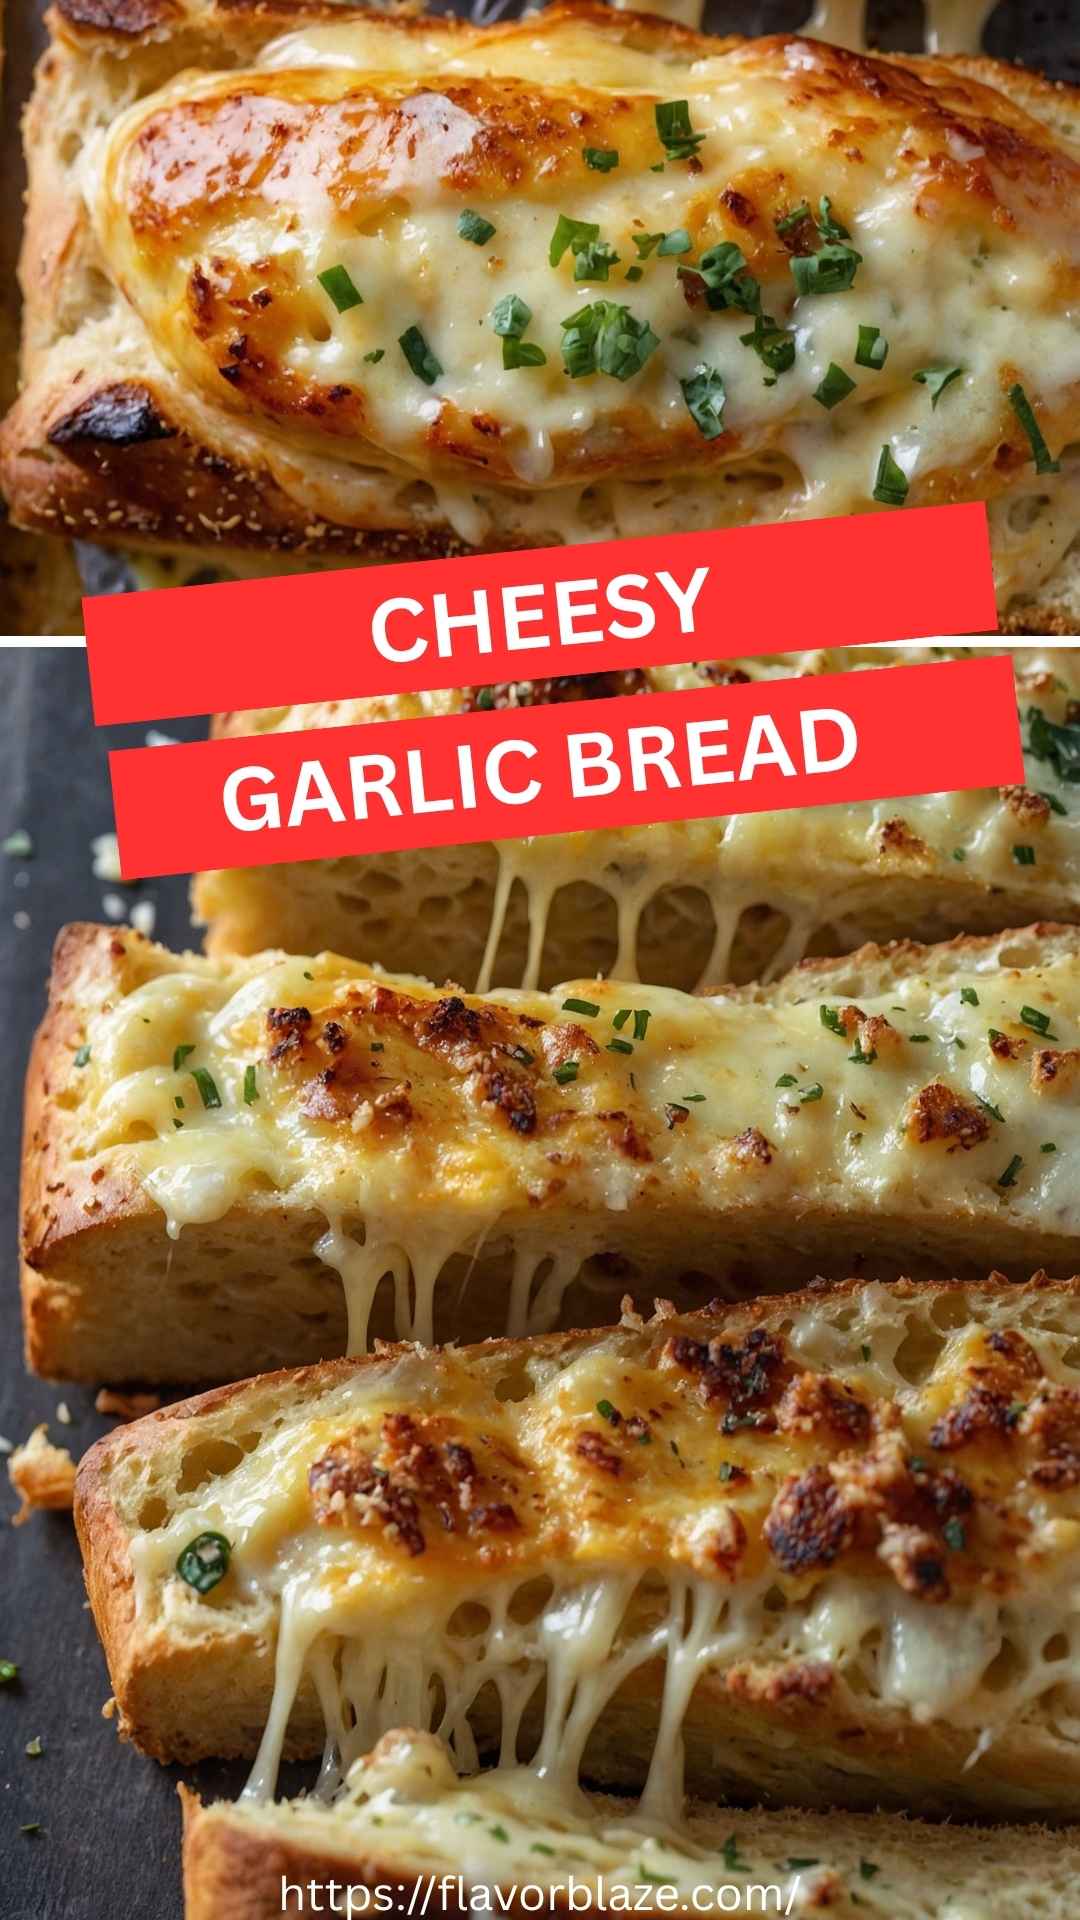
Let’s be real: what’s a meal without a delightful side dish? Cheesy garlic bread is one of those comforting accompaniments that can make any dinner feel like a special occasion. But hold on; this isn’t just any garlic bread. It’s cheesy, gooey, and packed with flavor. It pairs brilliantly with various dishes, elevating the entire dining experience.
Picture this: a warm, crispy loaf served alongside a rich spaghetti marinara, a fresh garden salad, or a hearty lasagna. Each bite of that cheesy goodness will leave you longing for more, making every meal unforgettable. So, what’s the deal with cheesy garlic bread? Let’s dive into the delicious details.

You’ll Also Like These Recipes
Many culinary creations walk a fine line between simple and sublime. Cheesy garlic bread fits that description perfectly. It’s not just bread; it’s a love letter to anyone who appreciates the beauty of garlic and cheese. When you bake a loaf of cheesy garlic bread, you’re not just making food—you’re creating an experience. This process invites you into the kitchen, mingling aromas of melting cheese and fresh garlic. It’s a celebration of comfort food, and I’m excited to share my go-to recipe with you.
What is Cheesy Garlic Bread?
Cheesy garlic bread is exactly what it sounds like. It combines crispy, toasted bread, melted cheese, and seasoned garlic butter. Usually, a rustic loaf is used for its sturdy structure. The bread is sliced, smothered in a mixture of butter, garlic, and herbs, then generously topped with cheese. The result? An impossibly delicious treat that you’ll want to eat by the plateful.
Why Does This Recipe Work?
This cheesy garlic bread recipe captures the essence of Italian cuisine, rooted in simplicity and the quality of ingredients. The combination of butter and garlic creates a rich base that enhances the flavors of the cheese. When baked, the cheese turns gooey and golden, while the bread crisps to perfection. Each element is carefully chosen to ensure that every bite is both satisfying and flavorful. Plus, it’s a great dish for gatherings, ensuring that no crumb goes uneaten.
What You’ll Need to Make This Dish
Before you don your apron, let’s gather the essential ingredients. Here’s what you’ll need:
2 to 2.5 cups (200–250g) shredded mozzarella cheese: This gooey cheese brings the stretch factor.
½ teaspoon garlic salt or sea salt: For that precise touch of seasoning.
½ teaspoon dried oregano or Italian seasoning: Adds an herby depth to the bread.
3 garlic cloves, finely minced (around 3 teaspoons): Fresh garlic makes all the difference!
2 tablespoons freshly grated Parmesan cheese: This provides that extra umami flavor and a beautiful golden topping.
100g (½ cup) unsalted butter, softened: The heavenly spread that ties everything together.
1 rustic bread loaf, about 30 cm (12 inches) in length: A sturdy base for your cheesy creation.

How to Make Cheesy Garlic Bread?
Making cheesy garlic bread is a straightforward process that delivers satisfying results. With just a few steps, you can transform simple ingredients into a mouthwatering side dish. Let’s break it down, step by step.
Step 1: Prepare the Garlic Butter
In a medium bowl, combine the softened unsalted butter, minced garlic, garlic salt, and dried oregano. This mixture will be the flavorful base for your cheesy topping. Stir until everything is well-blended. As the garlic hits the butter, you’re already set for some aromatic magic.
Step 2: Slice the Bread
Take your rustic loaf and carefully slice it in half lengthwise. If you prefer, you can slice it into smaller sections to create more manageable pieces. Just be sure not to cut all the way through; you want to keep the loaf connected at the bottom.
Step 3: Smother with Garlic Butter
Spread the garlic butter mixture generously over the cut sides of the bread. Make sure to get every nook and cranny, as this will infuse flavor into the bread.
Step 4: Add Cheese
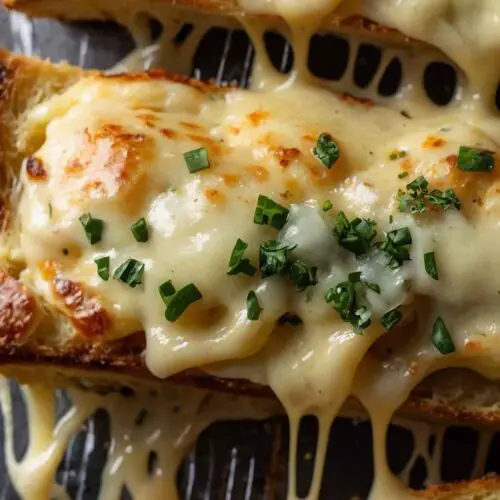
Sprinkle the shredded mozzarella cheese evenly over the buttered surfaces. Don’t skimp here—more cheese equals more joy. Then, finish with a generous sprinkle of grated Parmesan for extra flavor and a lovely golden finish when baked.
Step 5: Bake to Perfection
Preheat your oven to 375°F (190°C). Place the prepared bread on a baking sheet lined with parchment paper. Bake for about 15-20 minutes until the cheese is bubbly and begins to brown. Keep an eye on it because no one wants burnt garlic bread.
Step 6: Serve and Enjoy
Once baked, remove from the oven and let it cool for a minute. Slice and serve warm. The crispy edges, combined with the gooey cheese and flavorful garlic, make it an instant favorite.
Tips for Perfect Cheesy Garlic Bread
1. Use Fresh Ingredients: Fresh garlic definitely makes a difference in flavors. Don’t settle for pre-minced options when you can enjoy the real deal.
2. Experiment with Cheeses: While mozzarella is the traditional choice, blending in other cheeses like cheddar or gouda can create a unique flavor profile.
3. Add Fresh Herbs: Consider adding fresh parsley or basil for an added touch of freshness and color.
4. Grill Instead of Bake: If you own a grill, toss your garlic bread on it for a smoky flavor. Just keep the lid down to avoid burning.
5. Make it Spicy: For a kick, add red pepper flakes or minced jalapeños to the butter mixture.
How to Store Leftovers?
If you’re lucky enough to have leftovers, storing them is simple. Wrap the remaining garlic bread tightly in aluminum foil or plastic wrap and store it in the fridge. Enjoy it within a few days for the best taste. To reheat, pop it back in the oven or toaster oven for a few minutes until warmed through and crispy again.
Nutrition Information
While cheesy garlic bread is certainly a treat and not an everyday staple, here’s a rough estimate of its nutritional content per serving (based on a quarter of the loaf):
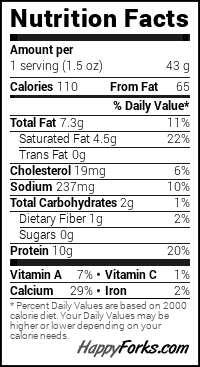
It’s delicious but should be enjoyed in moderation, especially if you’re keeping an eye on your calorie intake.
How Would I Recommend Serving Cheesy Garlic Bread?
Here are some fun ways to serve up your cheesy garlic bread:
With Pasta Dishes: Spaghetti and Meatballs—A classic match! The bread is perfect for soaking up the sauce.
As a Snack: Cheddar Broccoli Soup—Dip it into a warm bowl of soup for a cozy lunch or dinner. The gooey texture complements the creamy soup.
Alongside a Salad: Caesar Salad—Crunchy and garlicky bread pairs beautifully with a fresh basket of greens.
At a Picnic: Charcuterie Board—Slice the cheesy garlic bread into smaller pieces and serve it with a mix of cured meats, cheeses, and olives. It’s a hit!

What Alternatives Can You Use for the Ingredients if Not Available?
Sometimes, the hustle and bustle of life makes it tricky to find specific ingredients. Here are some substitutes you can consider:
Mozzarella Cheese: Provolone or Monterey Jack—These cheeses melt similarly and will provide a great texture.
Garlic Salt: Fresh Garlic and Sea Salt—If garlic salt isn’t available, combine fresh minced garlic with regular sea salt for your mix.
Dried Oregano: Italian Seasoning—This blend gives you all the flavor without having to dig through your spice rack.
Rustic Bread: French Baguette or Italian Loaf—These alternatives offer a similar sturdiness and flavor.
Cheesy Garlic Bread Recipe
Equipment
- Mixing bowl, whisk, spatula
Ingredients
- 2 to 2.5 cups 200–250g shredded mozzarella cheese
- ½ teaspoon garlic salt or sea salt
- ½ teaspoon dried oregano or Italian seasoning
- 3 garlic cloves finely minced (around 3 teaspoons)
- 2 tablespoons freshly grated Parmesan cheese
- 100 g ½ cup unsalted butter, softened
- 1 rustic bread loaf about 30 cm (12 inches) in length
Instructions
Step 1: Prepare the Garlic Butter
- In a medium bowl, combine the softened unsalted butter, minced garlic, garlic salt, and dried oregano. This mixture will be the flavorful base for your cheesy topping. Stir until everything is well-blended. As the garlic hits the butter, you’re already set for some aromatic magic.
Step 2: Slice the Bread
- Take your rustic loaf and carefully slice it in half lengthwise. If you prefer, you can slice it into smaller sections to create more manageable pieces. Just be sure not to cut all the way through; you want to keep the loaf connected at the bottom.
Step 3: Smother with Garlic Butter
- Spread the garlic butter mixture generously over the cut sides of the bread. Make sure to get every nook and cranny, as this will infuse flavor into the bread.
Step 4: Add Cheese
- Sprinkle the shredded mozzarella cheese evenly over the buttered surfaces. Don’t skimp here—more cheese equals more joy. Then, finish with a generous sprinkle of grated Parmesan for extra flavor and a lovely golden finish when baked.
Step 5: Bake to Perfection
- Preheat your oven to 375°F (190°C). Place the prepared bread on a baking sheet lined with parchment paper. Bake for about 15-20 minutes until the cheese is bubbly and begins to brown. Keep an eye on it because no one wants burnt garlic bread.
Step 6: Serve and Enjoy
- Once baked, remove from the oven and let it cool for a minute. Slice and serve warm. The crispy edges, combined with the gooey cheese and flavorful garlic, make it an instant favorite.
Notes
2. Experiment with Cheeses: While mozzarella is the traditional choice, blending in other cheeses like cheddar or gouda can create a unique flavor profile.
3. Add Fresh Herbs: Consider adding fresh parsley or basil for an added touch of freshness and color.
4. Grill Instead of Bake: If you own a grill, toss your garlic bread on it for a smoky flavor. Just keep the lid down to avoid burning.
5. Make it Spicy: For a kick, add red pepper flakes or minced jalapeños to the butter mixture.
Nutrition
Frequently Asked Questions
1. How do I know when the cheesy garlic bread is done?
Keep an eye on the cheese. When it’s bubbly and starting to brown, it’s time to pull it out. The bread should also be crispy on the edges.
2. Can I make cheesy garlic bread ahead of time?
Absolutely! Prepare it up to the baking stage, wrap it tightly in foil, and store it in the fridge for up to 24 hours. When you’re ready to enjoy, just bake it straight from the fridge, adding a few extra minutes to the baking time.
3. Is cheesy garlic bread suitable for freezing?
Yes, you can freeze cheesy garlic bread. Wrap it securely and store it in an airtight container. When ready to eat, thaw it overnight in the fridge and then bake when you want it warm.
4. Can I customize the toppings?
Definitely! Feel free to add sautéed mushrooms, sun-dried tomatoes, or even cooked bacon bits. The possibilities are endless!
5. What’s the best way to reheat leftover garlic bread?
Pop it in the oven or air fryer for just a few minutes. This will help restore that crispy texture, unlike the microwave, which can make it chewy.
6. Can I make a gluten-free version?
Certainly! Use your favorite gluten-free bread as a substitute. Just follow the same procedure for the garlic butter and cheese toppings.
Conclusion
Cheesy garlic bread is not just a side dish; it’s an experience that brings warmth and joy to the table. Whether served alongside pasta, salads, or as a simple snack, its magical combination of flavors makes it a staple in many households.
I hope this recipe inspires you to whip up your version and get everyone gathered around to enjoy. So, what are you waiting for? Gather those ingredients, put on that apron, and let the cheesy goodness begin!