
Before we dive into the creamy goodness of crème brûlée, let’s chat about what to enjoy alongside this delightful dessert. A rich dessert like crème brûlée pairs beautifully with lighter flavors. Here are a few options:
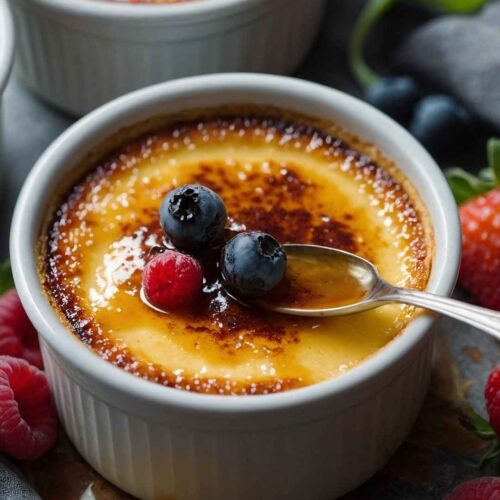
- Fresh Berries: Strawberries, raspberries, and blueberries are vibrant and tangy. They refresh your palate after each spoonful.
- Coffee or Espresso: The bitter notes of coffee contrast perfectly with the sweetness of the custard. An after-dinner espresso elevates the dining experience.
- Mint Tea: A soothing mint tea can cleanse your palate. It’s light and fragrant, allowing your taste buds to appreciate the nuances of the dessert.
- Savory Cheese: Pairing a small serving of creamy goat cheese or a mild blue cheese can create a sophisticated taste combination.
Now that you have some delightful options to pair with your crème brûlée, let’s explore the magic of making this classic dessert.

You’ll Also Like These Recipes
Crème brûlée is not just any dessert; it’s an experience. The moment you crack the hard sugar crust with your spoon, it feels like you’re launching into a world of indulgent creaminess. This French classic is deceptively simple, yet it evokes a sense of elegance that can transform an ordinary dinner into a special occasion.
I remember the first time I tasted homemade crème brûlée. The restaurant presented it with a small torch, caramelizing the sugar right at the table. The thrill of it wowed me, and I knew I had to recreate that at home.
What is Crème Brûlée?
At its core, crème brûlée is a custard dessert topped with a layer of hard caramel. The basic idea uses rich cream, egg yolks, and sugar. The top is caramelized, providing a satisfying crunch to complement the silky smooth custard beneath.
Why This Recipe Works
Let’s get into the details of why this crème brûlée recipe not only works but also becomes a standout on your dessert table.
- Simplicity of Ingredients
This recipe relies on five primary ingredients—heavy cream, egg yolks, sugar, vanilla, and cornstarch. With such simplicity, it’s easy to understand what you are making. You won’t need exotic items; most are commonplace in any well-stocked kitchen. - Technique Matters
The cooking method involves a water bath, which ensures even cooking. This technique helps to create that luxurious texture that defines crème brûlée. It’s all about gentle heat. Too much, and the custard curdles. Just right, and it’s a creamy dream. - Balance of Flavors
The sweetness of the sugar balances beautifully with the rich, creamy custard. Adding a vanilla bean or high-quality vanilla paste rounds out the flavor, adding complexity. - Customizable Topper
The crunchy sugar topping is customizable! You can use regular granulated sugar for a simple caramel or infuse flavors into it for a creative flair. Think about it—coffee, citrus zest, or even a pinch of cocoa can elevate this dish further.
Ingredients You’ll Need to Make This Crème Brûlée Recipe
To create this stunning dessert, gather the following ingredients:
- 5 egg yolks (bonus: you can use the leftover whites in an omelet or meringue)
- 1 teaspoon cornstarch (optional, but it enhances texture)
- 1/4 cup superfine sugar (also known as caster sugar)
- 1 vanilla bean or 1 teaspoon vanilla bean paste (for that rich vanilla flavor)
- 2 cups heavy cream (or pure cream, depending on your region)
For the toffee topping:
- 2 teaspoons superfine sugar (for caramelizing)

How To Make These?
Now, let’s get hands-on. Making crème brûlée involves a few key steps that, when followed, guarantee a delicious result. I’m here to take you through this process step by step.
Step 1: Preheat the Oven
Start by preheating your oven to 325°F (163°C). This temperature is ideal for cooking the custard gently.
Step 2: Heat the Cream
In a saucepan, pour the heavy cream and bring it to a simmer over medium heat. Stir occasionally to ensure it heats evenly. Once you see steam rising and tiny bubbles forming, remove it from the heat. This delicate heating helps infuse the cream with flavor.
Step 3: Mix Egg Yolks and Sugar
In a separate bowl, whisk together the egg yolks, sugar, and cornstarch (if using) until pale and slightly thickened. It’s important to whisk thoroughly to ensure the sugar dissolves and the mixture becomes uniform.
Step 4: Combine Cream and Egg Mixture
Now that the cream has cooled slightly, gradually pour it into the egg yolks mixture. Whisk continuously while adding. This method prevents the eggs from scrambling, which we definitely want to avoid!
Step 5: Strain the Mixture
Pour the combined mixture through a fine-mesh strainer into a large measuring cup or bowl, eliminating any bits of cooked egg. Straining ensures that your custard is smooth.
Step 6: Prepare the Ramekins
Place your ramekins in a baking dish. Pour the strained custard mixture into each ramekin, filling them nearly to the top.
Step 7: Water Bath
Carefully fill the baking dish with hot water until it reaches halfway up the sides of the ramekins. This water bath is key to ensure even cooking.
Step 8: Bake
Transfer the baking dish to your preheated oven. Bake for about 30 to 40 minutes. The custard should be set but still slightly wobbly in the center.
Step 9: Chill the Custards
Once baked, remove the ramekins from the water bath. Allow them to cool to room temperature, then refrigerate for at least 2 hours (or even overnight). Chilling enhances the flavors.
Step 10: Sugar Topping
Before serving, sprinkle a thin layer of superfine sugar on top of each custard.
Step 11: Caramelize
Using a kitchen torch, carefully melt the sugar until it forms a crispy, golden layer. If you don’t have a torch, you can place the ramekins under a broiler for a minute or two. Keep a close eye on them; sugar can go from perfect to burnt quickly!
Step 12: Let It Rest
Allow the sugar to cool and harden before digging into your crème brûlée.
Tips for Perfect Crème Brûlée
I want you to succeed in making this dessert, so here are some handy tips:
- Use good quality ingredients: The flavor of your crème brûlée relies heavily on the quality of your cream and vanilla. Spring for the good stuff.
- Don’t overmix: When combining the egg mixture with the cream, whisk gently but thoroughly to avoid introducing too much air. No one wants bubbles in their custard!
- Check for doneness: The center must be gently set, not firm. If it jiggles slightly, you’re on the right track.
- Chill well: Allow sufficient chilling time. Cooling not only firms the custard but also enhances the flavors.
- Prevent burning while caramelizing: If using a torch, keep it moving and don’t linger in one spot to avoid burning the sugar.
Nutrition Information
Each serving of crème brûlée delivers an indulgent yet satisfying experience. Here’s an approximate breakdown for one serving (based on a recipe serving six):
- Calories: 300
- Protein: 5g
- Total Fat: 20g
- Saturated Fat: 12g
- Carbohydrates: 29g
- Sugars: 19g
How to Store the Leftovers?
You might not have leftovers, but just in case you do, here’s how to store them:
- Chill Immediately: After the crème brûlée has set, tightly cover each ramekin with plastic wrap and refrigerate.
- Enjoy Within 3 Days: For the best flavor and texture, consume your leftovers within three days. The sugar topping should be caramelized fresh for the best crunch.
Recommended Side Dishes for Crème Brûlée
Why not elevate your meal with some sides that complement the creamy custard?
- Fruit Salad: A fresh fruit salad adds brightness. Opt for citrus and berries to cut through the richness of the dessert.
- Cheese Board: Assemble a small cheese board with light cheeses and crackers. The contrast of flavors enhances the crème brûlée experience.
- Chocolate Mousse: A light chocolate mousse serves as a delightful pairing. The bitterness and creaminess complement the dessert beautifully.
- Pistachio Biscotti: Crunchy biscotti offers a delightful texture and a nutty flavor that pairs wonderfully with the creamy dessert.

Substitute Options for Ingredients
Sometimes, we find ourselves missing an item from our pantry. Here are some clever substitutions:
- Heavy Cream: If you don’t have heavy cream, you can use half-and-half. The texture will be lighter but still delicious.
- Vanilla Bean: In a pinch, vanilla extract works perfectly. Use one teaspoon for every vanilla bean.
- Cornstarch: If you lack cornstarch, you can substitute with equal parts all-purpose flour. Just be aware that it may alter the texture slightly.
- Superfine Sugar: No superfine sugar? Just pulse regular granulated sugar in a blender for a few seconds to make your own!
Crème Brûlée
Equipment
- Bowl, Oven
Ingredients
- 5 egg yolks bonus: you can use the leftover whites in an omelet or meringue
- 1 teaspoon cornstarch optional, but it enhances texture
- 1/4 cup superfine sugar also known as caster sugar
- 1 vanilla bean or 1 teaspoon vanilla bean paste for that rich vanilla flavor
- 2 cups heavy cream or pure cream, depending on your region
For the toffee topping:
- 2 teaspoons superfine sugar for caramelizing
Instructions
Step 1: Preheat the Oven
- Start by preheating your oven to 325°F (163°C). This temperature is ideal for cooking the custard gently.
Step 2: Heat the Cream
- In a saucepan, pour the heavy cream and bring it to a simmer over medium heat. Stir occasionally to ensure it heats evenly. Once you see steam rising and tiny bubbles forming, remove it from the heat. This delicate heating helps infuse the cream with flavor.
Step 3: Mix Egg Yolks and Sugar
- In a separate bowl, whisk together the egg yolks, sugar, and cornstarch (if using) until pale and slightly thickened. It’s important to whisk thoroughly to ensure the sugar dissolves and the mixture becomes uniform.
Step 4: Combine Cream and Egg Mixture
- Now that the cream has cooled slightly, gradually pour it into the egg yolks mixture. Whisk continuously while adding. This method prevents the eggs from scrambling, which we definitely want to avoid!
Step 5: Strain the Mixture
- Pour the combined mixture through a fine-mesh strainer into a large measuring cup or bowl, eliminating any bits of cooked egg. Straining ensures that your custard is smooth.
Step 6: Prepare the Ramekins
- Place your ramekins in a baking dish. Pour the strained custard mixture into each ramekin, filling them nearly to the top.
Step 7: Water Bath
- Carefully fill the baking dish with hot water until it reaches halfway up the sides of the ramekins. This water bath is key to ensure even cooking.
Step 8: Bake
- Transfer the baking dish to your preheated oven. Bake for about 30 to 40 minutes. The custard should be set but still slightly wobbly in the center.
Step 9: Chill the Custards
- Once baked, remove the ramekins from the water bath. Allow them to cool to room temperature, then refrigerate for at least 2 hours (or even overnight). Chilling enhances the flavors.
Step 10: Sugar Topping
- Before serving, sprinkle a thin layer of superfine sugar on top of each custard.
Step 11: Caramelize
- Using a kitchen torch, carefully melt the sugar until it forms a crispy, golden layer. If you don’t have a torch, you can place the ramekins under a broiler for a minute or two. Keep a close eye on them; sugar can go from perfect to burnt quickly!
Step 12: Let It Rest
- Allow the sugar to cool and harden before digging into your crème brûlée.
Notes
- Use good quality ingredients: The flavor of your crème brûlée relies heavily on the quality of your cream and vanilla. Spring for the good stuff.
- Don’t overmix: When combining the egg mixture with the cream, whisk gently but thoroughly to avoid introducing too much air. No one wants bubbles in their custard!
- Check for doneness: The center must be gently set, not firm. If it jiggles slightly, you’re on the right track.
- Chill well: Allow sufficient chilling time. Cooling not only firms the custard but also enhances the flavors.
- Prevent burning while caramelizing: If using a torch, keep it moving and don’t linger in one spot to avoid burning the sugar.
Nutrition
Frequently Asked Questions
1. Can I use a different flavor instead of vanilla?
Absolutely! Feel free to experiment with flavors. Matcha, espresso, or even almond extract could be unusual yet delicious twists.
2. Is crème brûlée gluten-free?
Yes! All the ingredients are naturally gluten-free. Just ensure that no additional flavors you may add contain gluten.
3. Can I make this ahead of time?
Crème brûlée is perfect for preparing in advance. The custard can be made up to three days ahead. Just wait to caramelize the sugar until you’re ready to serve.
4. What if I don’t have a kitchen torch?
You can place the ramekins under a broiler for a few minutes. Just watch carefully to prevent burning.
5. How do I prevent the egg from curdling?
Use tempered egg yolks by gradually adding hot cream to the yolks while whisking continuously. This prevents shock and curdling.
Conclusion
Making crème brûlée at home is not just possible; it’s a delightful culinary adventure. As you crack the shell of sugar and dive into the creamy custard, you’ll realize the effort is well worth it. With this simple recipe and a few handy tips, you’ll impress your guests—or just yourself—every time.
So fire up your oven and play with flavors as you find your unique sparkle in this classic dish. Who knows? Maybe your crème brûlée will be the talk of summer gatherings, rivaling the barbecue in the dessert showdown! And remember, the spoon always holds the promise of a sweet ending.