Before diving into the joy of making Reese’s Peanut Butter Cups at home, let’s chat about what you can pair with these delicious treats. Picture this: you’ve just unwrapped a homemade peanut butter cup, and it’s a sunny afternoon. What complements that sweet, nutty goodness? Here are some ideas:
- Coffee: A cup of freshly brewed coffee balances out the sweetness of the peanut butter cup perfectly. The bitterness of the coffee enhances those chocolatey notes.
- Milk: This classic pairing is great for a reason. The cold, creamy milk brings out the rich flavors of the chocolate and peanut butter.
- Fruit: Try pairing with sliced apples or bananas. The freshness cuts through the sweetness, providing a delightful contrast.
- Ice Cream: For an extra indulgent treat, chop up the peanut butter cups and sprinkle them over vanilla ice cream. Heaven in a bowl!
- Nuts: Offer a side of assorted nuts. Their crunchiness pairs well with the soft texture of the peanut butter cups.

You’ll Also Like These Recipes
When it comes to indulging in something sweet, few things can compete with homemade Reese’s Peanut Butter Cups. Just thinking about those creamy peanut butter centers enveloped in rich chocolate gets my mouth watering. I can’t resist them! After a few experiments in my kitchen, I found the perfect balance of flavors and textures that make these cups truly irresistible. The best part? They’re surprisingly easy to make!
In this guide, I’ll walk you through the delightful process of creating your own delicious version of this classic candy. Trust me, once you try making these at home, the store-bought versions will not hold a candle to your creation. Grab your apron and let’s dive into this culinary adventure!
What Are Homemade Reese’s Peanut Butter Cups?
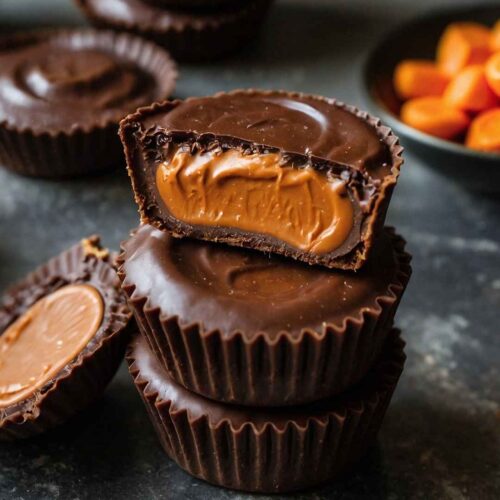
Homemade Reese’s Peanut Butter Cups are a delectable treat made from simple ingredients, reflecting the beloved peanut butter and chocolate combination we know all too well.
Unlike the store-bought version, which often includes added preservatives and artificial flavoring, making them at home lets you control the ingredients fully. It’s a satisfying blend of creamy peanut butter, chocolate, and just a hint of vanilla—pure bliss in every bite!
What is the Flavor Profile of This Dish?
The flavor profile of homemade Reese’s Peanut Butter Cups is as delightful as it is simple. You have the rich, slightly bitter flavor of dark chocolate harmonizing with the sweet and salty notes of peanut butter.
Add in a touch of brown sugar, and you’ll find a pleasant caramel undertone that emerges. The vanilla extract adds depth, elevating the overall experience. It’s that classic combination of sweet and savory that makes your taste buds dance with joy.
Why You’ll Love This?
You’ll love homemade Reese’s Peanut Butter Cups because they offer an experience, not just a snack! Making them yourself allows you to customize the flavors. Want it sweeter? Add more sugar.
Love dark chocolate? Swap it in! This is more than just a recipe; it’s a canvas for your creativity. Plus, they’re perfect for sharing, gifting, or enjoying all by yourself (no judgment here). They’re fun to make with friends or family, and they’re bound to be a conversation starter.
Ingredients
Let’s talk ingredients. Here’s what you’ll need to make these delectable peanut butter cups:
- 1 cup (120g) powdered sugar
- 500g (16 oz) melting chocolate (preferably semi-sweet or dark)
- 1 cup (250g) creamy peanut butter
- 1/2 teaspoon vanilla extract
- 1/4 cup (55g) packed light brown sugar
- 4 tablespoons (60g) unsalted butter

Step-by-Step Instructions
Step 1: Prepare Your Pan
Begin by lining a muffin tin with cupcake liners. This will make it much easier to remove your peanut butter cups once they’ve set. If you don’t have liners, you can lightly grease the tin.
Step 2: Melt the Chocolate
In a microwave-safe bowl, place about half of the chocolate. Heat it in the microwave in 30-second intervals, stirring between each. Keep going until it’s smoothly melted with no chunks left.
Step 3: Add Chocolate to the Muffin Tin
Use a spoon or a piping bag to fill each liner with about a tablespoon of melted chocolate. Swirl it to coat the bottom and up the sides of the liner. This layer is your chocolate shell, so make sure it’s even.
Step 4: Chill to Set the Chocolate
Pop the muffin tin into the fridge for about five minutes, or until the chocolate hardens slightly. If you’re impatient like me, a quick spin in the freezer will do the trick too!
Step 5: Make the Peanut Butter Filling
In a mixing bowl, combine the peanut butter, powdered sugar, brown sugar, butter, and vanilla extract. Mix until smooth and creamy. If it’s too thick, a dab more peanut butter will help!
Step 6: Fill the Chocolate Shells
Remove the muffin tin from the fridge. Scoop a generous spoonful of the peanut butter mixture and place it on top of the hardened chocolate. Flatten it a little so it fits evenly.
Step 7: Top with More Chocolate
Take the remaining melted chocolate and spoon it right over the peanut butter filling. You want to cover it entirely to create a seal.
Step 8: Chill Again
Return the muffin tin to the fridge and let everything set for another 15-20 minutes. Once it’s set, you’ll know the magic is complete!
Tips & Tricks
- Use High-Quality Chocolate: The chocolate makes up a big part of the experience. Go for something you enjoy eating on its own.
- Experiment with Flavors: Try adding a pinch of salt to your peanut butter mixture for a salted caramel twist. You can also swap out peanut butter for almond or cashew butter.
- Don’t Rush the Cooling: Allowing the cups to cool completely ensures they won’t fall apart when you take them out of the muffin tin.
- Make Them Fun: Add toppings like crushed nuts or colorful sprinkles on the chocolate layer before it sets.
- Cut Down on Sweetness: If you prefer a less sweet version, cut back on the powdered sugar. Adjust until it suits your taste!
Nutrition Information
You might be wondering about the nutrition content of these sweet treats. This is an indulgence, so moderation is key. Here’s a rough estimate for one homemade Reese’s Peanut Butter Cup (assuming you make 12):
- Calories: 120
- Protein: 3g
- Total Fat: 8g
- Saturated Fat: 3g
- Carbohydrates: 10g
- Sugar: 6g
How Can You Store These Homemade Reese’s Peanut Butter Cups?
If you find yourself with leftovers (or are just trying not to eat them all at once), storage is easy!
- In the Fridge: Keep them in an airtight container in the refrigerator. They’ll last about a week, but I promise they’ll be gone before then.
- In the Freezer: For longer storage, freeze them. Just ensure they’re in a tightly sealed container or freezer bag. They’ll keep for up to two months. Just let them thaw out in the fridge before enjoying.

If Some Ingredients Are Not Available in Your Pantry, What Are Some Alternative Choices You Can Consider?
Sometimes, you need to improvise. Here are some alternative choices if you find yourself lacking an ingredient:
- Peanut Butter: If you’re out, almond butter or sunflower seed butter work brilliantly. Both will give you a different but wonderful taste.
- Chocolate: Running low on melting chocolate? Try using cocoa powder mixed with coconut oil. The texture will differ, but the flavor aligns well!
- Powdered Sugar: If you have granulated sugar but no powdered, blend granulated sugar in a blender or food processor until it becomes fine. This can serve as a substitute in a pinch.
Homemade Reese’s Peanut Butter Cups
Equipment
- Bowl, Spoon
Ingredients
- 1 cup 120g powdered sugar
- 500 g 16 oz melting chocolate (preferably semi-sweet or dark)
- 1 cup 250g creamy peanut butter
- 1/2 teaspoon vanilla extract
- 1/4 cup 55g packed light brown sugar
- 4 tablespoons 60g unsalted butter
Instructions
Step 1: Prepare Your Pan
- Begin by lining a muffin tin with cupcake liners. This will make it much easier to remove your peanut butter cups once they’ve set. If you don’t have liners, you can lightly grease the tin.
Step 2: Melt the Chocolate
- In a microwave-safe bowl, place about half of the chocolate. Heat it in the microwave in 30-second intervals, stirring between each. Keep going until it’s smoothly melted with no chunks left.
Step 3: Add Chocolate to the Muffin Tin
- Use a spoon or a piping bag to fill each liner with about a tablespoon of melted chocolate. Swirl it to coat the bottom and up the sides of the liner. This layer is your chocolate shell, so make sure it’s even.
Step 4: Chill to Set the Chocolate
- Pop the muffin tin into the fridge for about five minutes, or until the chocolate hardens slightly. If you’re impatient like me, a quick spin in the freezer will do the trick too!
Step 5: Make the Peanut Butter Filling
- In a mixing bowl, combine the peanut butter, powdered sugar, brown sugar, butter, and vanilla extract. Mix until smooth and creamy. If it’s too thick, a dab more peanut butter will help!
Step 6: Fill the Chocolate Shells
- Remove the muffin tin from the fridge. Scoop a generous spoonful of the peanut butter mixture and place it on top of the hardened chocolate. Flatten it a little so it fits evenly.
Step 7: Top with More Chocolate
- Take the remaining melted chocolate and spoon it right over the peanut butter filling. You want to cover it entirely to create a seal.
Step 8: Chill Again
- Return the muffin tin to the fridge and let everything set for another 15-20 minutes. Once it’s set, you’ll know the magic is complete!
Notes
- Use High-Quality Chocolate: The chocolate makes up a big part of the experience. Go for something you enjoy eating on its own.
- Experiment with Flavors: Try adding a pinch of salt to your peanut butter mixture for a salted caramel twist. You can also swap out peanut butter for almond or cashew butter.
- Don’t Rush the Cooling: Allowing the cups to cool completely ensures they won’t fall apart when you take them out of the muffin tin.
- Make Them Fun: Add toppings like crushed nuts or colorful sprinkles on the chocolate layer before it sets.
- Cut Down on Sweetness: If you prefer a less sweet version, cut back on the powdered sugar. Adjust until it suits your taste!
Nutrition
Frequently Asked Questions
1. Can I use milk chocolate instead of dark chocolate?
Absolutely! Using milk chocolate will give your Peanut Butter Cups a sweeter, creamier flavor. It’s all about personal preference.
2. Can I make these vegan-friendly?
Yes! Substitute the butter with coconut oil or vegan butter, and ensure to use dark chocolate that’s dairy-free. The peanut butter you use should also be natural and free from additives.
3. Can I add extra ingredients to the filling?
Certainly! Feel free to mix in mini chocolate chips, crushed pretzels, or even a sprinkle of sea salt for added texture and flavor.
4. How can I make these gluten-free?
All the ingredients listed are naturally gluten-free, but double-check any brands you choose, especially the chocolates.
5. What’s the best way to clean up melted chocolate from my kitchen?
Melted chocolate can be tricky! Use warm soapy water to soak the utensils and bowls, helping to loosen any residue. A good scrub with a sponge should do the trick.
Conclusion
Homemade Reese’s Peanut Butter Cups are truly a treat worth your time. They combine the joys of cooking, sharing, and, of course, savoring each bite. With just a few simple ingredients and some time, you can make these delightful snacks that are far superior to anything you can buy at the store. They’re versatile, fun to make, and utterly delicious.
So, what are you waiting for? Roll up your sleeves and create your own little batch of happiness. Indulging in something homemade brings a joy that’s hard to replicate elsewhere. This recipe is more than just about flavors; it’s about creating memories in your kitchen, and trust me, those memories are bound to be some of your sweetest!