I’m thrilled to share one of my favorite discoveries with you today. Cloud bread has become my go-to when I’m craving something light and satisfying without the guilt. It pairs beautifully with savory toppings like bacon chicken ranch or sweet spreads like almond butter and berries. Whether you’re exploring low-carb options or simply looking for a fun kitchen experiment, this recipe is about to become your new favorite.
How I Discovered the Magic of Cloud Bread
I’ll never forget the afternoon I first attempted cloud bread in my kitchen. My daughter had just started a lower-carb lifestyle for athletic performance, and I was determined to help her find foods she’d actually enjoy eating. I remembered a technique from my culinary school days—whipping egg whites to create impossible height and volume—and decided to experiment.
The first batch emerged from the oven looking like fluffy clouds had landed on my baking sheet. My daughter took one bite and said, “Mom, this tastes like nothing I’ve ever had before.” That moment sparked a passion that’s never faded. Over the past decade, I’ve made hundreds of batches, refined the technique, and discovered exactly what makes this recipe succeed or fail. Today, I’m sharing all those secrets with you.

What is 3 Ingredient Cloud Bread Recipe?
Cloud bread is a revolutionary low-carbohydrate baked good that defies everything you think you know about traditional bread-making. Unlike conventional bread that relies on flour, yeast, and lengthy fermentation, cloud bread achieves its signature pillowy texture through a completely different mechanism: whipped egg whites.
The recipe emerged in the keto and low-carb communities around 2015, though the technique itself draws from classical French cooking—specifically the methods used to create soufflés and meringues. What makes this particular version special is its stunning simplicity. With only three ingredients, you can create something that tastes indulgent while keeping carbohydrates nearly non-existent.
The magic happens when you separate eggs and whip the whites to stiff peaks, creating thousands of tiny air bubbles. These bubbles get trapped in a custard-like mixture made from yolks and cream cheese, and when baked, they expand dramatically in the oven’s heat. The result? A bread that’s approximately 80% air, making it incredibly light on your digestive system while still providing satisfying protein.
Why You’ll Love This 3 Ingredient Cloud Bread Recipe
- Incredibly Versatile – Cloud bread works equally well as a savory vehicle for smoked salmon and cream cheese or as a sweet base for whipped toppings and fresh berries. I’ve served this at brunches, packed it in lunch boxes, and even created mini versions for parties.
- Naturally Gluten-Free – If you’re managing celiac disease or gluten sensitivity, this recipe is naturally free from problematic proteins. There’s no cross-contamination risk from flour additives or shared equipment concerns.
- Remarkably Low in Carbohydrates – With less than 1 gram of net carbs per serving, this bread fits seamlessly into keto, Atkins, and low-carb diets. I’ve worked with countless clients managing blood sugar, and this recipe consistently delivers results without metabolic disruption.
- Takes Just 25 Minutes Total – From preheat to cooling, this recipe demands minimal active time. You’ll spend maybe 8 minutes on actual hands-on work, making it perfect for busy mornings or unexpected cravings.
- Packed with High-Quality Protein – Each fluffy portion contains approximately 4-5 grams of complete protein from the eggs. That’s substantial nutrition in a food that weighs almost nothing on your plate, making it ideal for muscle recovery after workouts.
- Requires Zero Special Equipment – You don’t need a stand mixer (though it helps). A hand mixer or even a whisk and some elbow grease will work beautifully. I’ve made emergency batches with nothing but a fork and determination.
The Ingredients
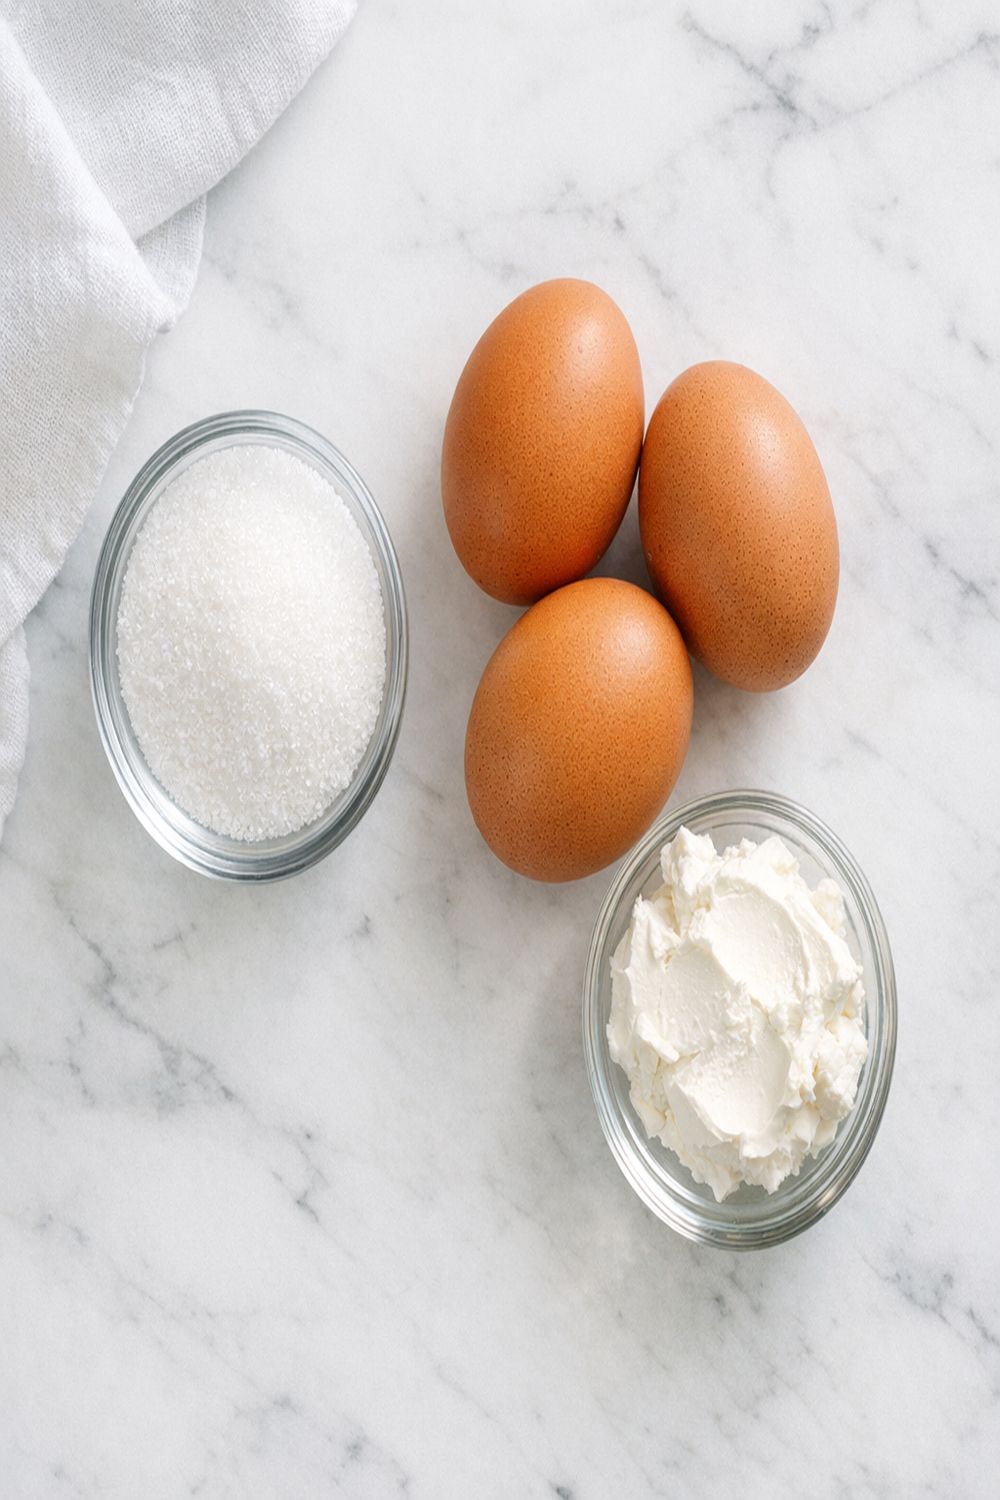
I want to be completely honest about something: ingredient quality matters more in this recipe than in almost any other I teach. Because we’re working with just three components and no flour or other fillers to hide behind, each element must be exceptional. Let me walk you through what you’ll need and why each choice is crucial.
- 1/4 teaspoon cream of tartar (helps stabilize egg whites and prevents deflation)
- 1/4 cup cream cheese (full-fat, at room temperature to blend smoothly without lumps)
- 1/2 teaspoon salt (fine sea salt or kosher salt for proper distribution)
- 1/4 teaspoon vanilla extract (optional but recommended for subtle flavor enhancement)
- 3 large eggs (whites and yolks separated, brought to room temperature for optimal whipping)
Yield: Makes 6 cloud bread portions, approximately 1 serving per person for a light meal or snack
Expert’s Nutritional Insight
As a registered dietitian, I want to highlight something important about the cream cheese in this recipe. While cream cheese is indeed a fat-based ingredient, it provides fat-soluble vitamins including vitamin A and D, which improve nutrient absorption from other foods. The fat also slows gastric emptying, meaning you’ll feel satisfied longer. This isn’t “empty” fat—it’s functional fat that supports your body’s nutrient utilization. The combination of egg protein plus cream cheese fat creates a satiety profile that keeps you feeling full for hours, which is why this bread works so beautifully in controlled eating patterns.
How to Make 3 Ingredient Cloud Bread?
Now we’re going to walk through this process together. I’m going to share exactly what I do, including the sensory cues that tell you whether you’re on track. This is where precision matters, but it’s also where your growing intuition becomes invaluable. After you make this a few times, you’ll develop a feel for the right consistency and texture.
Step 1: Prepare Your Equipment and Oven
Begin by preheating your oven to 325°F (160°C). This lower temperature is absolutely critical—I cannot stress this enough. Standard baking temperatures will cause the exterior to brown too quickly while the interior remains raw and gooey. Line a standard baking sheet with parchment paper, creating a non-stick surface that prevents sticking without added oils.
While the oven warms, separate your three eggs, placing whites into one mixing bowl and yolks into another. This is where cleanliness becomes non-negotiable. Even a microscopic speck of yolk fat will prevent your whites from reaching proper peaks. Use completely clean, dry bowls—if you’ve been washing dishes, use a fresh one rather than one that might have oil residue.

Step 2: Whip the Egg Whites to Perfect Stiffness
Add the 1/2 teaspoon of salt to your egg whites. If you have cream of tartar available (this is optional but genuinely helpful), add 1/4 teaspoon now. These ingredients stabilize the protein structure you’re about to create. Using an electric mixer on medium-high speed, begin beating the whites.
Within about 30 seconds, you’ll notice foaming. Continue beating. Within 60 seconds, soft peaks should form—when you lift the beater, the peaks will droop and fall back into the mixture. Keep going. After about 2-3 minutes total, the whites should reach stiff peaks—when you lift the beater, the peaks stand straight up and hold their shape. This is your target.
Here’s the sensory test I use: tilt the bowl slightly. If properly whipped egg whites slide at all, they need more time. When they’re ready, they’ll stay put even when tilted. You’ll also notice the texture transforms from clear and glossy to opaque and matte, almost like shaving cream.

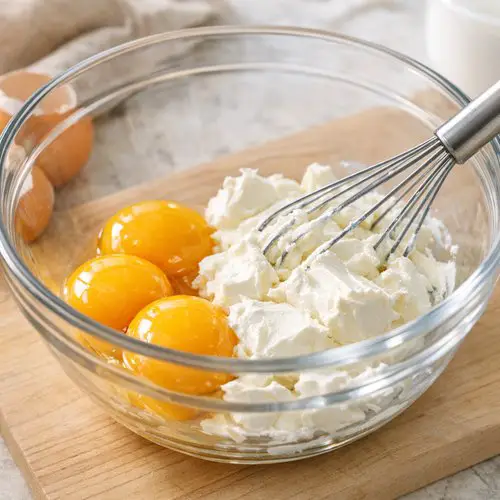
Step 3: Combine Yolks with Cream Cheese
While the whites are being worked, place your cream cheese and egg yolks into a second mixing bowl. This is your second crucial moment. The cream cheese must be at room temperature—if it’s cold from the refrigerator, it won’t blend smoothly and you’ll end up with tiny lumps scattered throughout your batter.
Using an electric mixer on medium speed, blend these ingredients together until you achieve a pale, uniform yellow color, roughly 1-2 minutes of beating. The mixture should be smooth and creamy, with no visible streaks of white cream cheese remaining. You’re not whipping this mixture like the egg whites—you’re just creating a smooth base.
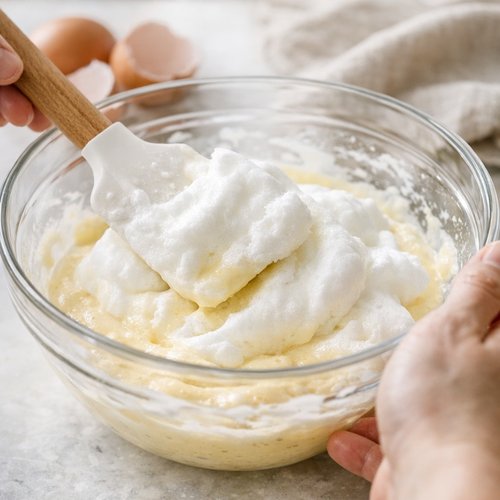
Step 4: Fold With Intention and Gentleness
This step is where I see most people falter, and I understand why. After all that vigorous whipping, it feels wrong to be so gentle. But this moment determines whether you’ll get fluffy clouds or dense, deflated pancakes.
Using a silicone spatula, gently fold about one-third of the stiff egg white mixture into the yolk-cream cheese mixture. Use this motion: insert the spatula down the center of the bowl, sweep across the bottom, and fold the mixture up and over itself, rotating the bowl as you go. You’re not stirring—you’re folding. After about 10 folds, add the next third of egg whites and repeat. Add the final third and fold gently until just combined.
The batter should still show some streaks of white—that’s actually okay. Overmixing is worse than slight unevenness. You want to preserve as many of those precious air bubbles as possible. When I fold, I typically do 15-20 total folds, and the process takes about 45 seconds.
Step 5: Portion and Space Carefully
Using a large spoon or small ice cream scoop, portion the batter onto your prepared baking sheet. You should create 6 mounds, each about the size of a generous tablespoon. Leave at least 2 inches of space between each portion—these will puff up during baking, and you don’t want them merging together.
The portions will look delicate and slightly wobbly. That’s perfect. Don’t worry about them being perfectly shaped—they’ll level out during baking.

Step 6: Bake Until Golden and Set
Place the baking sheet in your preheated 325°F oven. Set a timer for 20 minutes, then begin checking around the 18-minute mark. You’re looking for the tops to turn a light golden color and the structure to feel set and firm when you gently touch it with your finger.
The baking time typically runs 20-25 minutes, depending on your oven’s accuracy and humidity levels. If your oven runs hot, you might finish closer to 20 minutes. If it runs cool, you may need the full 25. The cloud bread is done when the exterior is pale golden and the interior springs back when lightly pressed.
Here’s a professional tip: if you open the oven door before 18 minutes, the sudden temperature change can cause deflation. Resist the urge to peek!

Step 7: Cool Before Serving
Once golden, remove from the oven and let the cloud bread cool on the baking sheet for 5-10 minutes. During this time, the structure continues to set and firm up. After this brief cooling period, you can transfer to a wire rack or serve immediately.
The cloud bread will be warm, fluffy, and absolutely heavenly at this point. The texture should be light and slightly spongy, almost like a very delicate angel food cake.

Tips and Tricks
- Room Temperature Matters – Cold eggs don’t whip to the same volume as room temperature eggs. Remove your eggs from the refrigerator 15-20 minutes before starting. This makes a measurable difference in your final yield and fluffiness.
- Invest in a Good Mixer – While you can technically whip egg whites by hand with a wire whisk, an electric mixer saves tremendous time and effort. If you’re making this regularly, it’s worth the small investment.
- Use Parchment Paper, Not Greasing – I’ve tested both greasing the pan and using parchment paper. Parchment wins every time because it doesn’t interfere with the delicate structure. Oil creates a barrier that prevents proper browning on the bottom.
- The Cream of Tartar Secret – If you have cream of tartar in your pantry (it’s inexpensive and lasts forever), add 1/4 teaspoon to your egg whites before beating. It stabilizes the foam and makes deflation much less likely. This ingredient is often used in meringues and whipped egg whites for exactly this reason.
- Don’t Skip the Salt – Salt does more than add flavor. It interferes with gluten development (not relevant here) but more importantly, it helps stabilize the egg white foam and brings out subtle flavors. Never skip it.
- Humidity Affects Results – On very humid days, your egg whites might take slightly longer to whip, and your baking time might extend by a couple minutes. This is totally normal and nothing to worry about.
- Your Oven Temperature Matters More Than Timing – If you have an oven thermometer, use it. Many home ovens run 25-50°F hotter or cooler than their display indicates. Cloud bread is sensitive to temperature variations, so knowing your actual oven temperature is invaluable.
Common Mistakes to Avoid
- Using Cold Cream Cheese – This is the number one problem I see. Cold cream cheese won’t incorporate smoothly into the yolks, leaving you with a lumpy base. Always let it sit out for at least 20 minutes.
- Over-Mixing the Batter – I understand the instinct to blend everything thoroughly, but this destroys the air bubbles you’ve worked so hard to create. Fold gently and stop when you see just a few white streaks remaining.
- Baking at Too High Temperature – Using 350°F or higher will brown the outside before the inside cooks through. You’ll end up with a crispy exterior and raw, gooey center. The lower 325°F temperature allows even, gentle cooking throughout.
- Not Separating Eggs Properly – Even a tiny amount of yolk in your whites will prevent proper foaming. Separate eggs into three bowls (one for whites, one for yolks, and one “holding” bowl) to catch any yolks that break during separation.
Make-Ahead Guide
One question I get frequently is whether cloud bread can be made ahead. The answer is partially yes, with some caveats. Cloud bread is best served fresh, within a few hours of baking, when the texture is at its peak fluffiness.
However, if you want to prepare ahead, here’s what works: You can separate your eggs the night before and refrigerate them in covered containers. About 20 minutes before you’re ready to bake, remove them to come to room temperature. You can also measure out your cream cheese and have it softening on the counter.
Once baked, cooled cloud bread will keep up to 3 days in an airtight container at room temperature or up to 5 days refrigerated. However, the texture will become progressively denser and less cloud-like. To refresh, you can lightly toast it in a toaster oven at 300°F for 3-4 minutes, which helps restore some of the airy quality.
Freezing is possible but not ideal—freeze in a single layer on a baking sheet first, then transfer to freezer bags. Frozen cloud bread keeps for up to 1 month. Thaw at room temperature for about 30 minutes before serving.
Can I Store 3 Ingredient Cloud Bread?
As a dietitian who works with clients managing meal prep and time constraints, I love questions about storage because proper storage preserves both quality and safety. Cloud bread has different storage requirements than traditional bread because of its high egg content.
Room Temperature Storage: Keep cloud bread in an airtight container at room temperature for up to 3 days. The controlled moisture environment prevents staling while keeping oxygen out. Place a paper towel in the container to absorb excess moisture and prevent condensation.
Refrigerator Storage: For extended freshness, transfer to the refrigerator where cloud bread will keep for up to 5 days in an airtight container. Cold temperatures slow mold growth and extend shelf life considerably. The texture becomes slightly denser when chilled, which some people actually prefer for structural integrity when topping heavily.
Freezer Storage: Cloud bread freezes surprisingly well. Arrange individual portions on a baking sheet, freeze until solid (about 2 hours), then transfer to labeled freezer bags. Frozen cloud bread maintains quality for up to 4 weeks. Thaw at room temperature for 20-30 minutes before serving, or gently warm in a 300°F oven for 3-4 minutes.
Important Note: Given the egg content in this recipe, never leave cloud bread at room temperature for more than 2 hours in warm environments or after topping with protein-based toppings.
Nutrition Information
Each cloud bread portion contains approximately:
- Calories: 85
- Protein: 4.5 grams
- Fat: 6.8 grams
- Net Carbohydrates: 0.3 grams
- Fiber: 0 grams
These values are based on USDA nutritional data for standard large eggs, full-fat cream cheese, and salt. The macronutrient profile makes cloud bread exceptional for low-carbohydrate and ketogenic diets. The protein-to-calorie ratio is outstanding—you’re getting nearly 5 grams of complete protein in just 85 calories.
From a micronutrient perspective, eggs provide choline (essential for brain function), selenium (a powerful antioxidant), and lutein (important for eye health). The cream cheese adds fat-soluble vitamin A. While cloud bread isn’t intended as a major nutrient source, it fills a specific nutritional need without introducing excessive calories or carbohydrates.
For individuals managing blood sugar—including those with type 2 diabetes or prediabetes—the near-zero net carb content means virtually no glycemic impact. This has been a game-changer for many of my clients who thought they’d have to give up bread-like foods.
What Can I Serve With 3 Ingredient Cloud Bread?
The beautiful versatility of cloud bread means you can serve it sweet or savory depending on your meal or craving. I’ve found that the blank-slate flavor profile actually makes it the perfect vehicle for showcasing other ingredients. Here are my favorite combinations:
- Smoked Salmon and Dill – Top with cream cheese, smoked salmon, fresh dill, red onion, and a squeeze of lemon. This creates an elegant breakfast or lunch that tastes restaurant-quality but takes 2 minutes to assemble.
- Almond Butter and Berries – Spread with unsalted almond butter and top with fresh raspberries or sliced strawberries for a naturally sweet treat that satisfies without spiking blood sugar.
- Savory Breakfast Sandwich – Layer with scrambled eggs, bacon, avocado, and a thin slice of cheddar cheese. Pair it with bacon wrapped asparagus for a complete, protein-rich breakfast.
- Turkey and Avocado – Classic deli-style with sliced turkey, fresh avocado, lettuce, and mustard. This makes an excellent lunch that travels well because cloud bread doesn’t make the “bread” soggy the way traditional bread does.
- Egg Salad – Since cloud bread is made from eggs, pairing it with creamy egg salad creates a nostalgic deli experience that’s actually high in protein and low in carbs.
- Cinnamon and Butter – For a simple sweet option, spread with softened butter and sprinkle with cinnamon and a tiny amount of sugar-free sweetener. Toasted lightly under the broiler creates crispy edges.
- Pizza-Style – Top with sugar-free marinara, mozzarella cheese, and your favorite pizza toppings like pepperoni or vegetables. A quick toast in the toaster oven melts everything beautifully.
- Cream Cheese and Lox – Similar to the smoked salmon preparation but with a generous schmear of cream cheese as the base. Add capers and thin red onion slices for complexity.
- Chia Seed Jam and Greek Yogurt – Layer with thick Greek yogurt and homemade chia seed jam for a sweet, protein-packed breakfast that feels indulgent.
The key to success with cloud bread toppings is understanding that because the bread is so light and airy, it works best with flavorful, textured toppings. Bland spreads will disappear into the background. Bold, interesting flavor combinations are where cloud bread truly shines.
Substitutes
- Neufchâtel Cheese Instead of Cream Cheese – If you’re looking to reduce fat slightly, neufchâtel contains about one-third less fat than traditional cream cheese while maintaining similar flavor and texture. The result is marginally lighter, though equally delicious.
- Mascarpone Cheese for Richness – Using mascarpone creates a richer, slightly more indulgent version. Use the same amount (1/4 cup) and expect slightly denser cloud bread with a more custardy interior.
- Greek Yogurt for Lower Fat – Substitute half the cream cheese with full-fat Greek yogurt (so 2 tablespoons cream cheese plus 2 tablespoons yogurt). This increases protein slightly while reducing total fat, though the texture becomes slightly less dense.
- Ricotta as a Low-Fat Option – Use 1/4 cup whole milk ricotta for a lighter version that’s still creamy. Ricotta is less fatty than cream cheese, so you’ll get slightly less richness but still excellent results.
- Flavored Cream Cheese Variations – If you want more flavor without adding ingredients, use flavored cream cheese like everything bagel, herb, or smoked salmon varieties. This adds personality without changing the basic technique.
- Honey or Vanilla for Sweet Versions – Add 1/4 teaspoon pure vanilla extract to the yolk mixture for sweet applications, or a tiny drizzle of honey (though this increases carbs very slightly). These additions make cloud bread taste like a dessert option.
Seasonal Variations
One of my favorite aspects of working with recipes across multiple seasons is discovering how simple adjustments make them feel fresh and relevant year-round. Cloud bread is surprisingly adaptable to seasonal ingredients and flavor profiles.
Spring: Add 1/4 teaspoon lemon zest to the yolk mixture and top with fresh berries, whipped mascarpone, and candied lemon peel. The bright, citrusy note feels perfect as temperatures warm.
Summer: Create a strawberry shortcake version by topping with fresh whipped cream and macerated strawberries. The lightness of cloud bread pairs beautifully with summer berries and cream. You can also serve chilled for a refreshing summer treat.
Fall: Add 1/4 teaspoon pumpkin pie spice to the yolk mixture (cinnamon, nutmeg, clove combination) and top with sugar-free pumpkin butter or cream cheese. This seasonal variation became an instant fall favorite in my kitchen.
Winter: Create a peppermint version by adding 1/4 teaspoon peppermint extract to the yolks and top with chocolate ganache and crushed sugar-free candy canes. This feels festive and indulgent during colder months.

3 Ingredient Cloud Bread Recipe
Ingredients
- 1/4 teaspoon cream of tartar helps stabilize egg whites and prevents deflation
- 1/4 cup cream cheese full-fat, at room temperature to blend smoothly without lumps
- 1/2 teaspoon salt fine sea salt or kosher salt for proper distribution
- 1/4 teaspoon vanilla extract optional but recommended for subtle flavor enhancement
- 3 large eggs whites and yolks separated, brought to room temperature for optimal whipping
Instructions
Step 1: Prepare Your Equipment and Oven
- Begin by preheating your oven to 325°F (160°C). This lower temperature is absolutely critical—I cannot stress this enough. Standard baking temperatures will cause the exterior to brown too quickly while the interior remains raw and gooey. Line a standard baking sheet with parchment paper, creating a non-stick surface that prevents sticking without added oils. While the oven warms, separate your three eggs, placing whites into one mixing bowl and yolks into another. This is where cleanliness becomes non-negotiable. Even a microscopic speck of yolk fat will prevent your whites from reaching proper peaks. Use completely clean, dry bowls—if you’ve been washing dishes, use a fresh one rather than one that might have oil residue.

Step 2: Whip the Egg Whites to Perfect Stiffness
- Add the 1/2 teaspoon of salt to your egg whites. If you have cream of tartar available (this is optional but genuinely helpful), add 1/4 teaspoon now. These ingredients stabilize the protein structure you’re about to create. Using an electric mixer on medium-high speed, begin beating the whites. Within about 30 seconds, you’ll notice foaming. Continue beating. Within 60 seconds, soft peaks should form—when you lift the beater, the peaks will droop and fall back into the mixture. Keep going. After about 2-3 minutes total, the whites should reach stiff peaks—when you lift the beater, the peaks stand straight up and hold their shape. This is your target. Here’s the sensory test I use: tilt the bowl slightly. If properly whipped egg whites slide at all, they need more time. When they’re ready, they’ll stay put even when tilted. You’ll also notice the texture transforms from clear and glossy to opaque and matte, almost like shaving cream.

Step 3: Combine Yolks with Cream Cheese
- While the whites are being worked, place your cream cheese and egg yolks into a second mixing bowl. This is your second crucial moment. The cream cheese must be at room temperature—if it’s cold from the refrigerator, it won’t blend smoothly and you’ll end up with tiny lumps scattered throughout your batter. Using an electric mixer on medium speed, blend these ingredients together until you achieve a pale, uniform yellow color, roughly 1-2 minutes of beating. The mixture should be smooth and creamy, with no visible streaks of white cream cheese remaining. You’re not whipping this mixture like the egg whites—you’re just creating a smooth base.

Step 4: Fold With Intention and Gentleness
- This step is where I see most people falter, and I understand why. After all that vigorous whipping, it feels wrong to be so gentle. But this moment determines whether you’ll get fluffy clouds or dense, deflated pancakes. Using a silicone spatula, gently fold about one-third of the stiff egg white mixture into the yolk-cream cheese mixture. Use this motion: insert the spatula down the center of the bowl, sweep across the bottom, and fold the mixture up and over itself, rotating the bowl as you go. You’re not stirring—you’re folding. After about 10 folds, add the next third of egg whites and repeat. Add the final third and fold gently until just combined. The batter should still show some streaks of white—that’s actually okay. Overmixing is worse than slight unevenness. You want to preserve as many of those precious air bubbles as possible. When I fold, I typically do 15-20 total folds, and the process takes about 45 seconds.

Step 5: Portion and Space Carefully
- Using a large spoon or small ice cream scoop, portion the batter onto your prepared baking sheet. You should create 6 mounds, each about the size of a generous tablespoon. Leave at least 2 inches of space between each portion—these will puff up during baking, and you don’t want them merging together. The portions will look delicate and slightly wobbly. That’s perfect. Don’t worry about them being perfectly shaped—they’ll level out during baking.

Step 6: Bake Until Golden and Set
- Place the baking sheet in your preheated 325°F oven. Set a timer for 20 minutes, then begin checking around the 18-minute mark. You’re looking for the tops to turn a light golden color and the structure to feel set and firm when you gently touch it with your finger. The baking time typically runs 20-25 minutes, depending on your oven’s accuracy and humidity levels. If your oven runs hot, you might finish closer to 20 minutes. If it runs cool, you may need the full 25. The cloud bread is done when the exterior is pale golden and the interior springs back when lightly pressed. Here’s a professional tip: if you open the oven door before 18 minutes, the sudden temperature change can cause deflation. Resist the urge to peek!

Step 7: Cool Before Serving
- Once golden, remove from the oven and let the cloud bread cool on the baking sheet for 5-10 minutes. During this time, the structure continues to set and firm up. After this brief cooling period, you can transfer to a wire rack or serve immediately. The cloud bread will be warm, fluffy, and absolutely heavenly at this point. The texture should be light and slightly spongy, almost like a very delicate angel food cake.

Notes
Nutrition
FAQs
Why Didn’t My Egg Whites Whip to Stiff Peaks?
This is the most common issue, and it has predictable causes. First, even microscopic amounts of yolk fat prevent proper foam formation—this is the most likely culprit. Solution: separate eggs into three bowls and transfer whites one at a time to avoid any yolk contamination. Second, cold egg whites whip more slowly and to less volume. Always use room temperature eggs. Third, your mixing bowl or beaters might have invisible oil residue. Wash with hot soapy water and dry thoroughly, or use a bowl you know is clean. Finally, ensure you’re using fresh eggs—older eggs have thinner whites that foam less efficiently.
Can I Make This Recipe Without Cream Cheese?
The cream cheese serves a specific purpose beyond flavor—it adds fat and emulsifiers that help stabilize the structure and create that signature custardy interior. You can substitute other dairy options like mascarpone or Greek yogurt (see Substitutes section), but removing dairy entirely would require different ratios and technique. I don’t recommend omitting it entirely because the result won’t be the same cloud bread experience you’re hoping for.
Is Cloud Bread Safe for People With Egg Allergies?
Unfortunately, no. Cloud bread contains three large eggs as its primary ingredient, making it unsuitable for anyone with egg allergies. This isn’t a recipe that can be easily modified for egg-free cooking because eggs are the structural foundation, not a replaceable ingredient. If you have clients or family members with egg allergies, I’d recommend exploring entirely different low-carb bread alternatives like almond flour-based options.
Why Did My Cloud Bread Turn Out Dense Instead of Fluffy?
Density indicates that too many air bubbles escaped during the baking process or weren’t created to begin with. The most common causes: overmixing the batter (destroying bubbles before they reach the oven), opening the oven door before 18 minutes (causing sudden collapse), baking at too high a temperature (setting the structure too quickly before full rise occurs), or using cold ingredients. Address these one by one to troubleshoot. Also verify that your baking sheet isn’t positioned on a lower oven rack—the heat distribution needs to be even.
Can I Add Sweetener to Make Sweet Cloud Bread?
Absolutely! Add 1/4 to 1/2 teaspoon of your preferred sweetener (stevia, monk fruit, or erythritol work beautifully) to the yolk-cream cheese mixture. Add 1/4 teaspoon vanilla extract for additional sweetness perception. Be cautious with liquid sweeteners, which can affect the batter’s consistency. Some people also find that dusting the finished cloud bread with a tiny amount of powdered sweetener creates a dessert-like effect without changing the recipe itself.
More Recipes You’ll Love
- Bacon Chicken Ranch Recipe – A hearty, protein-packed main course that pairs beautifully with cloud bread as a sandwich or side.
- Asparagus Oven Recipe – Roasted asparagus complements cloud bread in any breakfast or brunch setting with minimal carbs.
- Atkins Chili Recipe – Low-carb and satisfying, this chili works wonderfully as a topping for cloud bread in a savory application.
The Cloud Bread Journey Continues
I’ve shared my cloud bread technique with thousands of people over the years, and I never get tired of hearing success stories. Someone who thought they’d have to give up bread discovers they can have this. Someone managing their weight finally finds a food that satisfies without derailing progress. Someone with diabetes discovers they can enjoy bread-like foods without blood sugar spikes.
That’s what keeps me passionate about teaching cooking. Food isn’t just nutrition—it’s comfort, tradition, and joy. When you master cloud bread, you’re not just learning a recipe. You’re joining a community of people who’ve discovered that eating well doesn’t mean deprivation.
Make this recipe this week. Feel free to email me about your results, questions, or creative variations you discover. And remember—every expert was once a beginner who made mistakes and learned from them. Your cloud bread might not be perfect the first time, and that’s beautifully, perfectly okay.
Happy Cooking!