
3 Ingredient Cloud Bread Recipe
I'm thrilled to share one of my favorite discoveries with you today. Cloud bread has become my go-to when I'm craving something light and satisfying without the guilt. It pairs beautifully with savory toppings like bacon chicken ranch or sweet spreads like almond butter and berries. Whether you're exploring low-carb options or simply looking for a fun kitchen experiment, this recipe is about to become your new favorite.
Ingredients
- 1/4 teaspoon cream of tartar helps stabilize egg whites and prevents deflation
- 1/4 cup cream cheese full-fat, at room temperature to blend smoothly without lumps
- 1/2 teaspoon salt fine sea salt or kosher salt for proper distribution
- 1/4 teaspoon vanilla extract optional but recommended for subtle flavor enhancement
- 3 large eggs whites and yolks separated, brought to room temperature for optimal whipping
Instructions
Step 1: Prepare Your Equipment and Oven
- Begin by preheating your oven to 325°F (160°C). This lower temperature is absolutely critical—I cannot stress this enough. Standard baking temperatures will cause the exterior to brown too quickly while the interior remains raw and gooey. Line a standard baking sheet with parchment paper, creating a non-stick surface that prevents sticking without added oils. While the oven warms, separate your three eggs, placing whites into one mixing bowl and yolks into another. This is where cleanliness becomes non-negotiable. Even a microscopic speck of yolk fat will prevent your whites from reaching proper peaks. Use completely clean, dry bowls—if you've been washing dishes, use a fresh one rather than one that might have oil residue.

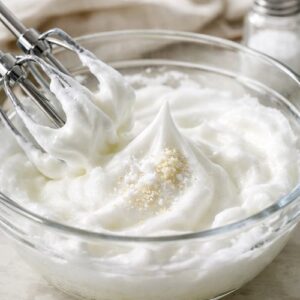
Step 2: Whip the Egg Whites to Perfect Stiffness
- Add the 1/2 teaspoon of salt to your egg whites. If you have cream of tartar available (this is optional but genuinely helpful), add 1/4 teaspoon now. These ingredients stabilize the protein structure you're about to create. Using an electric mixer on medium-high speed, begin beating the whites. Within about 30 seconds, you'll notice foaming. Continue beating. Within 60 seconds, soft peaks should form—when you lift the beater, the peaks will droop and fall back into the mixture. Keep going. After about 2-3 minutes total, the whites should reach stiff peaks—when you lift the beater, the peaks stand straight up and hold their shape. This is your target. Here's the sensory test I use: tilt the bowl slightly. If properly whipped egg whites slide at all, they need more time. When they're ready, they'll stay put even when tilted. You'll also notice the texture transforms from clear and glossy to opaque and matte, almost like shaving cream.
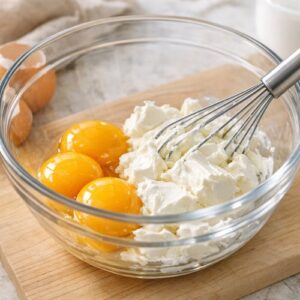
Step 3: Combine Yolks with Cream Cheese
- While the whites are being worked, place your cream cheese and egg yolks into a second mixing bowl. This is your second crucial moment. The cream cheese must be at room temperature—if it's cold from the refrigerator, it won't blend smoothly and you'll end up with tiny lumps scattered throughout your batter. Using an electric mixer on medium speed, blend these ingredients together until you achieve a pale, uniform yellow color, roughly 1-2 minutes of beating. The mixture should be smooth and creamy, with no visible streaks of white cream cheese remaining. You're not whipping this mixture like the egg whites—you're just creating a smooth base.
Step 4: Fold With Intention and Gentleness
- This step is where I see most people falter, and I understand why. After all that vigorous whipping, it feels wrong to be so gentle. But this moment determines whether you'll get fluffy clouds or dense, deflated pancakes. Using a silicone spatula, gently fold about one-third of the stiff egg white mixture into the yolk-cream cheese mixture. Use this motion: insert the spatula down the center of the bowl, sweep across the bottom, and fold the mixture up and over itself, rotating the bowl as you go. You're not stirring—you're folding. After about 10 folds, add the next third of egg whites and repeat. Add the final third and fold gently until just combined. The batter should still show some streaks of white—that's actually okay. Overmixing is worse than slight unevenness. You want to preserve as many of those precious air bubbles as possible. When I fold, I typically do 15-20 total folds, and the process takes about 45 seconds.

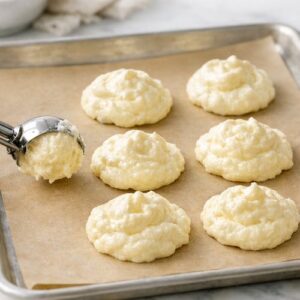
Step 5: Portion and Space Carefully
- Using a large spoon or small ice cream scoop, portion the batter onto your prepared baking sheet. You should create 6 mounds, each about the size of a generous tablespoon. Leave at least 2 inches of space between each portion—these will puff up during baking, and you don't want them merging together. The portions will look delicate and slightly wobbly. That's perfect. Don't worry about them being perfectly shaped—they'll level out during baking.
Step 6: Bake Until Golden and Set
- Place the baking sheet in your preheated 325°F oven. Set a timer for 20 minutes, then begin checking around the 18-minute mark. You're looking for the tops to turn a light golden color and the structure to feel set and firm when you gently touch it with your finger. The baking time typically runs 20-25 minutes, depending on your oven's accuracy and humidity levels. If your oven runs hot, you might finish closer to 20 minutes. If it runs cool, you may need the full 25. The cloud bread is done when the exterior is pale golden and the interior springs back when lightly pressed. Here's a professional tip: if you open the oven door before 18 minutes, the sudden temperature change can cause deflation. Resist the urge to peek!

Step 7: Cool Before Serving
- Once golden, remove from the oven and let the cloud bread cool on the baking sheet for 5-10 minutes. During this time, the structure continues to set and firm up. After this brief cooling period, you can transfer to a wire rack or serve immediately. The cloud bread will be warm, fluffy, and absolutely heavenly at this point. The texture should be light and slightly spongy, almost like a very delicate angel food cake.

Notes
- Room Temperature Matters - Cold eggs don't whip to the same volume as room temperature eggs. Remove your eggs from the refrigerator 15-20 minutes before starting. This makes a measurable difference in your final yield and fluffiness.
- Invest in a Good Mixer - While you can technically whip egg whites by hand with a wire whisk, an electric mixer saves tremendous time and effort. If you're making this regularly, it's worth the small investment.
- Use Parchment Paper, Not Greasing - I've tested both greasing the pan and using parchment paper. Parchment wins every time because it doesn't interfere with the delicate structure. Oil creates a barrier that prevents proper browning on the bottom.
- The Cream of Tartar Secret - If you have cream of tartar in your pantry (it's inexpensive and lasts forever), add 1/4 teaspoon to your egg whites before beating. It stabilizes the foam and makes deflation much less likely. This ingredient is often used in meringues and whipped egg whites for exactly this reason.
- Don't Skip the Salt - Salt does more than add flavor. It interferes with gluten development (not relevant here) but more importantly, it helps stabilize the egg white foam and brings out subtle flavors. Never skip it.
- Humidity Affects Results - On very humid days, your egg whites might take slightly longer to whip, and your baking time might extend by a couple minutes. This is totally normal and nothing to worry about.
Nutrition
Calories: 68kcalCarbohydrates: 1gProtein: 4gFat: 5gSugar: 1g
Tried this recipe?Let us know how it was!